


Star Wars Armada - Wave III News
MosEisleyRaumhafen :: Weitere Star Wars Spiele... :: [Armada] "Flottenbasierte Raumgefechte" :: Armada News
Seite 1 von 1

 Star Wars Armada - Wave III News
 Herendon Do 17 März 2016, 10:35

"The Emperor has sent an alternative solution."
–Grand Moff Tarkin
Fantasy Flight Games is proud to announce the upcoming release of the third wave of expansions for Star Wars™: Armada!
The Galactic Civil War rages on, and so do the tactical fleet battles of Star Wars: Armada. In Armada, you assume the role of fleet admiral with either the Galactic Empire or Rebel Alliance, assemble your ships, and fly to meet the enemy. The combats are big and brutal, and your strategy must balance your focus on the objective against the destruction of your enemy.
The game's rules for fleet building permit you the freedom to fly the ships that best suit your strategy, and each wave of expansions adds new options for you to pursue. Wave I allowed you to build your fleet to full strength, introducing a classic assortment of ships and starfighters, including Victory-class Star Destroyers, Nebulon-B frigates, TIE fighters, and X-wing squadrons. Wave II increased the game's scope even further, adding the Imperial-class Star Destroyer and Home One as the first large-base ships and increasing the standard fleet build to a full 400 points.
Now, even as the game's core experience remains rooted in your ability to plan your approach, command your ships, and obliterate your enemy, Wave III introduces yet another dimension to your battles. Its two expansions, the Imperial Assault Carriers Expansion Pack and the Rebel Transports Expansion Pack, introduce the "flotilla" to Armada. Treated like standard ships—with a couple of notable exceptions—flotillas come with a host of inexpensive, highly tactical abilities that allow you to coordinate your fleet more closely than ever!
Introducing the Flotilla

The flotilla enters Wave III as an all-new type of ship. Flotillas operate in most ways the same as larger ships, but because they represent multiple, smaller ships, flotillas feature two plastic ship models, instead of one. Apart from this difference, they follow the same rules as other ships, with one exception—when a flotilla would overlap or be overlapped by another ship, only the flotilla takes a facedown damage card. You do not deal a facedown damage card to the closest ship the flotilla overlapped unless that ship is also a flotilla.
Flotillas, however, do more than merely introduce a new type of ship; they also introduce a new fleet support role that you can incorporate into your fleet and games. Both of the flotillas in Wave III feature the Fleet Support upgrade icon. These upgrades are remarkable in Armada because they do less to improve the ship that bears them than they do to boost the rest of your fleet. Bolster your squadrons, repair your ships, or improve your larger ships' ability to respond to immediate threats—Fleet Support upgrades ensure that your flotillas can play a useful role in any attack plan.
Imperial Assault Carriers Expansion Pack
The popular Gozanti-class cruiser arrives to Armada in Wave III in the Imperial Assault Carriers Expansion Pack.
With just one die in their left, right, and forward battery armaments, and no dice to fire from their rear arcs, your flotilla of Gozanti-class cruisers is not going to intimidate your opponent into surrender, but only a fool would dismiss their impact. First of all, a flotilla of Imperial assault carriers comes with a fleet-point cost more comparable to your fighter squadrons than your other ships. Next, it gains a surprising measure of survivability from its scatter and evade tokens. Most important, however, is the wide range of abilities that your Gozanti-class bring to battle with its new Fleet Support upgrades.

Of the expansion's eight upgrades, half of them bear the Fleet Support icon. Unlike most upgrades, these do not add muscle to the ship that equips them, but to the other ships and squadrons in your fleet. Accordingly, you might use your Imperial assault carrier to add punch to a Bomber build by equipping a Bomber Command Center, or you might equip a Comms Net to provide critical command flexibility to your larger ships. No matter which Fleet Support upgrade it equips, your flotilla of Imperial assault carriers does more than add another piece to the puzzle; it binds those pieces together.
Rebel Transports Expansion Pack
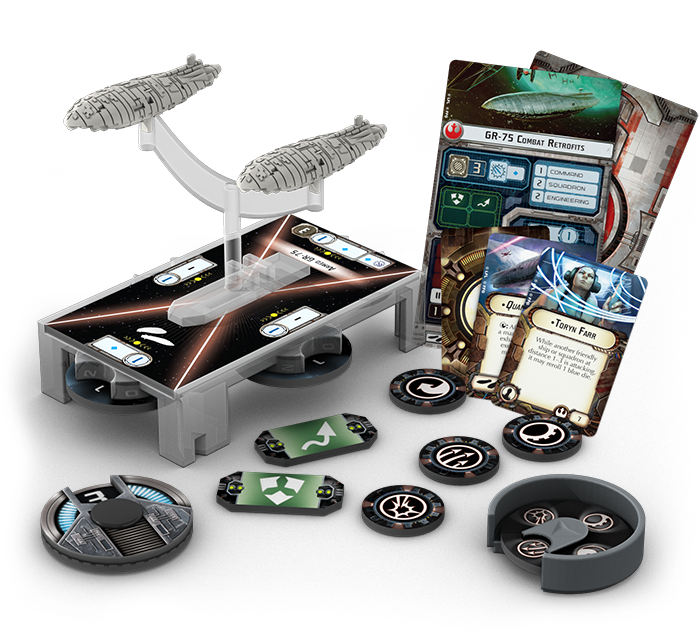
The counterpart to the Galactic Empire's Imperial Assault Carriers Expansion Pack, the Rebel Transports Expansion Pack introduces a flotilla of GR-75 medium transports. You can then field these ships as either GR-75 Combat Retrofits or as GR-75 Medium Transports, the first ship in Armada to have no inherent ship-to-ship combat capability.
Still, for what it lacks in its own punch, the Rebel Transports Expansion Pack more than supplies in support. As with the Imperial Assault Carriers Expansion Pack, four of the eight upgrades in the Rebel Transports Expansion Pack feature the Fleet Support icon. This means you can use a flotilla of GR-75 transports to relay commands to your larger ships with a Comms Net, or you can trail behind your largest ships with Repair Crews to keep them in the fight a bit longer. And that can make the difference between victory or defeat. After all, even one additional round of fire from your Home One is easily going to outstrip the contribution that nearly any other Rebel ship could have made over the course of two or three rounds.

The Rebel Transports Expansion Pack's focus on fleet support does not stop with its Fleet Support upgrades, either. It also introduces a new commander and a crew member who can provide free rerolls to friendly ships within distance one to three.
Support Your Fleet
"All troop carriers will assemble at the north entrance. The heavy transport ships will leave as soon as they’re loaded."
–Leia Organa
As a game of massive fleet battles, Star Wars™: Armada has always rewarded sound strategy and clever tactics. Likewise, its battles have always revolved around your ability to achieve your objectives. Soon, the new flotillas and upgrades from Wave III will elevate these game elements to even greater heights. Use them to maintain your focus on the objective, or use them to gain an advantage in combat. Either way, these new flotillas add an exciting new dimension to your battles for the fate of the galaxy.
Brace yourself for fleet battles that are tighter and more tactical than ever. Armada Wave III is scheduled to arrive at retailers in the third quarter of 2016!

Herendon- Boarding Team Mos Eisley


Re: Star Wars Armada - Wave III News
Herendon Sa 30 Apr 2016, 08:11
"Have no fear. Help is on the way."
–Agent Kallus
With the upcoming release of Wave III expansions for Star Wars™: Armada, the Empire can call upon the many tactical strengths of its flotillas of Gozanti-class cruisers.
As we noted in the announcement of Armada Wave III, the flotilla from the Imperial Assault Carriers Expansion Pack enters the game as a new type of small-base ship that features two miniatures and uses all the standard ship rules with an exception for the way that they function in collisions. More importantly, we addressed the fact that your flotilla of Imperial Gozanti-class cruisers features the new Fleet Support upgrade icon, which allows it to perform any number of different roles in your fleet. And though we looked at a couple of the different implications in the announcement article, we've only just begun to scratch the surface.
Today, we'll look more closely at the ships and Fleet Support upgrades in the Imperial Assault Carriers Expansion Pack and the myriad ways they can reinforce your fleet's overall strategy.

Cruisers and Assault Carriers
As with all the other Armada starships released thus far, your flotilla of Gozanti-class cruisers can be paired with either of two different ship cards—the Gozanti-class Cruisers or the Gozanti-class Assault Carriers.


As both of these flotillas can only fire a single die at a time in ship-to-ship combat, neither is likely to be used in such a capacity. Admittedly, with the red attack die from their forward hull zone, the Gozanti-class Assault Carriers are more likely to be able to fire a shot or two at an enemy ship. Still, with only three hull and no more than a single point of shielding on each hull zone, your Gozantis cannot afford to get caught in enemy fire. Not even their potent scatter token will protect them against the sort of sustained fire an Assault Frigate Mark II or the Home One could throw at them.
Instead, you will most likely want to keep these ships at a distance and use them to support your squadrons or your other ships. After all, with their squadron value of "2," your Gozantis offer you a highly cost-efficient means of conveying commands to your bombers and other squadrons. Indeed, you should probably expect to see these flotillas anchoring bomber squadrons, often making use of Expanded Hangar Bay , Bomber Command Center , and the Vector Title.

Equipped with an Expanded Hangar Bay, the Vector commands three Firespray squadrons to bombard the Rebellion's Corellian corvette.
Perhaps simply because it seems so natural to hold your Gozantis back at a distance from the main thrust of the battle, you may also see a few daring fleet admirals aim for the element of surprise by flying their Gozanti flotillas straight at an enemy ship in order to soften it up for the rest of their fleet. Such a tactic would likely rely heavily upon the Gozanti's scatter token, possibly even discarding it in the initial approach in order to bring the flotilla's Slicer Tools into play.
Some clever maneuvering may allow a Gozanti commander to get within range of its Slicer Tools, even as it stays just out of range of the black dice on a ship like the MC30c Torpedo Frigate, and the fleet admirals who can pull off this sort of maneuver are the ones who should consider flying the Suppressor and recruiting General Tagge as their commander, in order to refresh their flotillas' scatter tokens in the third and fifth rounds of play.

The Suppressor flies into range to use its Slicer Tools against the Rebellion's MC30c frigate, even while staying out of range of the ship's potent black dice. Since the MC30c is currently unable to command any squadrons, the Imperial commander resets its top command dial to a squadron command, and if the MC30c ends its maneuver within distance 1–3 of the Suppressor, the Imperial commander will also be able to exhaust one of its defense tokens.
Fleet Support
There are a total of four different Fleet Support upgrades in the Imperial Assault Carriers Expansion Pack. Along with the Bomber Command Center and Slicer Tools, you will also find Comms Net and a Jamming Field . Each stands to define your flotilla of Gozantis by outfitting it with a different ability, but more than that, each suggests a different way of flying your flotilla.
• The Bomber Command Center requires you to keep your flotilla within distance 1-5 of friendly bombers.
• Your Comms Net requires you to keep your flotilla within distance 1-5 of a friendly ship.
• Slicer Tools require you put your Gozantis at risk, by maneuvering them within distance 1-3 of an enemy ship.
• Finally, a Jamming Field works best when you can maneuver your flotilla beyond distance "2" of your squadrons, yet can remain at distance 1-2 of the enemy squadrons engaged with them.
Because they offer the most forgiving ranges and require you only to maneuver your flotilla into position with your other ships and squadrons, rather than establishing a position relative to your opponent's ships or squadrons, the Bomber Command Center and Comms Net are likely the easiest Fleet Support upgrades to incorporate, and one can easily imagine facing future Imperial fleets that use their Imperial Assault Carriers not only to fling Major Rhymer and other bombers at enemy ships, but also to feed their Imperial-class Star Destroyers an engineering token each round, so that the bigger ships can keep their shields up almost indefinitely.

The Imperial commander assigns an engineering command to his Gozanti flotilla, then uses its Comms Net to pass the engineering token to the Imperial-class Star Destroyer, allowing it to spend six engineering points when it reveals its own engineering command. The Star Destroyer then uses those six engineering points to recharge its left hull zone's shields from zero to three.
On the other hand, it is precisely because the other two Fleet Support upgrades—the Slicer Tools and Jamming Field—are so much more difficult to coordinate that they may eventually prove to make the greater impact. Their use requires a greater degree of skill and vision, but it is easy to imagine how a flotilla equipped with Director Isard and Slicer Tools may render enemy ships more vulnerable to your Imperial-class Star Destroyer's Phylon Q7 Tractor Beams .

By using its Slicer Tools to change an Assault Frigate Mark II's top dial from a navigate command to a squadron command, the flotilla of Imperial assault carriers renders the Rebel ship vulnerable to the Imperial-class Star Destroyer's tractor beam, ensuring that the Star Destroyer will be able to keep it within its front arc for at least one more volley.
Moreover, the more highly skilled fleet admirals will also do a better job of anticipating the ways that ships and squadrons are likely to move across the battlefield, and it is easy to believe that some of the most highly skilled admirals will be able to plan their maneuvers so that their flotillas can command their bombers into battle before following after them with their Jamming Fields to protect them from retaliatory strikes by enemy fighter wings. Add another flotilla of Gozantis and the Intel keyword from a squadron like Dengar's , and you may be able to design a small, mobile strikeforce that can fairly well ignore enemy squadrons as it repeatedly hammers enemy ships.

The Imperial commander uses his Gozantis to command Dengar and a pair of TIE bombers to strike at a Nebulon-B frigate. Then, through some skillful maneuvering, he catches the Rebel squadrons within range of his Jamming Field, even while leaving his squadrons clear.
General Tagge and Agent Kallus
Rounding out the Imperial Assault Carriers Expansion Pack's eight different upgrades are its commander and officer, General Tagge and Agent Kallus .

With his ability to restore defense tokens, General Tagge is a boon to any strategy making use of aggresively minded Gozanti commanders, who may certainly need to burn their scatter tokens to survive. But his influence also reaches far beyond aggressive Gozantis. For starters, you could burn defense tokens from your Devastator in the early rounds to gain offensive advantages, and then regain them in the third and fifth rounds in order to hold the ship together for the eventual win. Similarly, Tagge allows you to more aggressively burn shields to fuel the attacks from your Dominator since, later, you will be able to recover one or two of the defense tokens you likely need to stay intact.
Nonetheless, Tagge is not, himself, truly an aggressively minded upgrade. He is more defensive, and it is only his foresightedness that shores up the weaknesses you expose by attacking so aggressively. Among other things, that means that you need to plan your approach to best maximize your offense in the early rounds, at which time you'll want to burn defense tokens to withstand your enemy's attacks. By the start of the third and fifth rounds, you will want to have gained a significant advantage, and Tagge should be helping you recoup the costs.
Finally, Agent Kallus provides an answer to any Rebel fleet that threatens to harry your ships with unique squadrons. Arguably best used aboard a Raider II-class Corvette equipped with one of its unique Titles, the Impetuous or Instigator , Agent Kallus is also a natural fit for a Gozanti flotilla designed to lead a fighter wing ordered to hunt down enemy bombers. Aboard a flotilla of Gozanti-class Assault Carriers with Jamming Field and Expanded Hangar Bay, Agent Kallus and his squadrons are more than capable of thwarting any Rebel bomber wing.

Agent Kallus leads a fighter wing to intercept the Rebellion's unique fighter aces. After skillfully catching Luke Skywalker and "Dutch" Vander in two firing arcs, Kallus adds a total of five dice to his flotilla's attacks for the round—one to his attack against Wedge Antilles, and one each to all the flotilla's attacks against Luke and "Dutch."
How Will You Fly Your Flotillas?
Ultimately, the best way to fly a flotilla of Gozanti-class cruisers is the way that best complements your overall strategy. But the question remains: how will you make use of these flexible flotillas to complement your fleet? Will you rely upon them to activate your squadrons? Will you field multiple flotillas and activate them early in order to draw out your opponent's larger ships? Will you use them to ensure your commands are more effective than your opponent's, from round to round?
These new Imperial flotillas present all manner of possibilities, and as you wait for our upcoming preview of the Rebel Transports Expansion Pack, we encourage you to share your favorite uses of the Gozanti flotillas with the other members of our community forums!
–Agent Kallus
With the upcoming release of Wave III expansions for Star Wars™: Armada, the Empire can call upon the many tactical strengths of its flotillas of Gozanti-class cruisers.
As we noted in the announcement of Armada Wave III, the flotilla from the Imperial Assault Carriers Expansion Pack enters the game as a new type of small-base ship that features two miniatures and uses all the standard ship rules with an exception for the way that they function in collisions. More importantly, we addressed the fact that your flotilla of Imperial Gozanti-class cruisers features the new Fleet Support upgrade icon, which allows it to perform any number of different roles in your fleet. And though we looked at a couple of the different implications in the announcement article, we've only just begun to scratch the surface.
Today, we'll look more closely at the ships and Fleet Support upgrades in the Imperial Assault Carriers Expansion Pack and the myriad ways they can reinforce your fleet's overall strategy.
Cruisers and Assault Carriers
As with all the other Armada starships released thus far, your flotilla of Gozanti-class cruisers can be paired with either of two different ship cards—the Gozanti-class Cruisers or the Gozanti-class Assault Carriers.
As both of these flotillas can only fire a single die at a time in ship-to-ship combat, neither is likely to be used in such a capacity. Admittedly, with the red attack die from their forward hull zone, the Gozanti-class Assault Carriers are more likely to be able to fire a shot or two at an enemy ship. Still, with only three hull and no more than a single point of shielding on each hull zone, your Gozantis cannot afford to get caught in enemy fire. Not even their potent scatter token will protect them against the sort of sustained fire an Assault Frigate Mark II or the Home One could throw at them.
Instead, you will most likely want to keep these ships at a distance and use them to support your squadrons or your other ships. After all, with their squadron value of "2," your Gozantis offer you a highly cost-efficient means of conveying commands to your bombers and other squadrons. Indeed, you should probably expect to see these flotillas anchoring bomber squadrons, often making use of Expanded Hangar Bay , Bomber Command Center , and the Vector Title.
Equipped with an Expanded Hangar Bay, the Vector commands three Firespray squadrons to bombard the Rebellion's Corellian corvette.
Perhaps simply because it seems so natural to hold your Gozantis back at a distance from the main thrust of the battle, you may also see a few daring fleet admirals aim for the element of surprise by flying their Gozanti flotillas straight at an enemy ship in order to soften it up for the rest of their fleet. Such a tactic would likely rely heavily upon the Gozanti's scatter token, possibly even discarding it in the initial approach in order to bring the flotilla's Slicer Tools into play.
Some clever maneuvering may allow a Gozanti commander to get within range of its Slicer Tools, even as it stays just out of range of the black dice on a ship like the MC30c Torpedo Frigate, and the fleet admirals who can pull off this sort of maneuver are the ones who should consider flying the Suppressor and recruiting General Tagge as their commander, in order to refresh their flotillas' scatter tokens in the third and fifth rounds of play.
The Suppressor flies into range to use its Slicer Tools against the Rebellion's MC30c frigate, even while staying out of range of the ship's potent black dice. Since the MC30c is currently unable to command any squadrons, the Imperial commander resets its top command dial to a squadron command, and if the MC30c ends its maneuver within distance 1–3 of the Suppressor, the Imperial commander will also be able to exhaust one of its defense tokens.
Fleet Support
There are a total of four different Fleet Support upgrades in the Imperial Assault Carriers Expansion Pack. Along with the Bomber Command Center and Slicer Tools, you will also find Comms Net and a Jamming Field . Each stands to define your flotilla of Gozantis by outfitting it with a different ability, but more than that, each suggests a different way of flying your flotilla.
• The Bomber Command Center requires you to keep your flotilla within distance 1-5 of friendly bombers.
• Your Comms Net requires you to keep your flotilla within distance 1-5 of a friendly ship.
• Slicer Tools require you put your Gozantis at risk, by maneuvering them within distance 1-3 of an enemy ship.
• Finally, a Jamming Field works best when you can maneuver your flotilla beyond distance "2" of your squadrons, yet can remain at distance 1-2 of the enemy squadrons engaged with them.
Because they offer the most forgiving ranges and require you only to maneuver your flotilla into position with your other ships and squadrons, rather than establishing a position relative to your opponent's ships or squadrons, the Bomber Command Center and Comms Net are likely the easiest Fleet Support upgrades to incorporate, and one can easily imagine facing future Imperial fleets that use their Imperial Assault Carriers not only to fling Major Rhymer and other bombers at enemy ships, but also to feed their Imperial-class Star Destroyers an engineering token each round, so that the bigger ships can keep their shields up almost indefinitely.
The Imperial commander assigns an engineering command to his Gozanti flotilla, then uses its Comms Net to pass the engineering token to the Imperial-class Star Destroyer, allowing it to spend six engineering points when it reveals its own engineering command. The Star Destroyer then uses those six engineering points to recharge its left hull zone's shields from zero to three.
On the other hand, it is precisely because the other two Fleet Support upgrades—the Slicer Tools and Jamming Field—are so much more difficult to coordinate that they may eventually prove to make the greater impact. Their use requires a greater degree of skill and vision, but it is easy to imagine how a flotilla equipped with Director Isard and Slicer Tools may render enemy ships more vulnerable to your Imperial-class Star Destroyer's Phylon Q7 Tractor Beams .
By using its Slicer Tools to change an Assault Frigate Mark II's top dial from a navigate command to a squadron command, the flotilla of Imperial assault carriers renders the Rebel ship vulnerable to the Imperial-class Star Destroyer's tractor beam, ensuring that the Star Destroyer will be able to keep it within its front arc for at least one more volley.
Moreover, the more highly skilled fleet admirals will also do a better job of anticipating the ways that ships and squadrons are likely to move across the battlefield, and it is easy to believe that some of the most highly skilled admirals will be able to plan their maneuvers so that their flotillas can command their bombers into battle before following after them with their Jamming Fields to protect them from retaliatory strikes by enemy fighter wings. Add another flotilla of Gozantis and the Intel keyword from a squadron like Dengar's , and you may be able to design a small, mobile strikeforce that can fairly well ignore enemy squadrons as it repeatedly hammers enemy ships.
The Imperial commander uses his Gozantis to command Dengar and a pair of TIE bombers to strike at a Nebulon-B frigate. Then, through some skillful maneuvering, he catches the Rebel squadrons within range of his Jamming Field, even while leaving his squadrons clear.
General Tagge and Agent Kallus
Rounding out the Imperial Assault Carriers Expansion Pack's eight different upgrades are its commander and officer, General Tagge and Agent Kallus .
With his ability to restore defense tokens, General Tagge is a boon to any strategy making use of aggresively minded Gozanti commanders, who may certainly need to burn their scatter tokens to survive. But his influence also reaches far beyond aggressive Gozantis. For starters, you could burn defense tokens from your Devastator in the early rounds to gain offensive advantages, and then regain them in the third and fifth rounds in order to hold the ship together for the eventual win. Similarly, Tagge allows you to more aggressively burn shields to fuel the attacks from your Dominator since, later, you will be able to recover one or two of the defense tokens you likely need to stay intact.
Nonetheless, Tagge is not, himself, truly an aggressively minded upgrade. He is more defensive, and it is only his foresightedness that shores up the weaknesses you expose by attacking so aggressively. Among other things, that means that you need to plan your approach to best maximize your offense in the early rounds, at which time you'll want to burn defense tokens to withstand your enemy's attacks. By the start of the third and fifth rounds, you will want to have gained a significant advantage, and Tagge should be helping you recoup the costs.
Finally, Agent Kallus provides an answer to any Rebel fleet that threatens to harry your ships with unique squadrons. Arguably best used aboard a Raider II-class Corvette equipped with one of its unique Titles, the Impetuous or Instigator , Agent Kallus is also a natural fit for a Gozanti flotilla designed to lead a fighter wing ordered to hunt down enemy bombers. Aboard a flotilla of Gozanti-class Assault Carriers with Jamming Field and Expanded Hangar Bay, Agent Kallus and his squadrons are more than capable of thwarting any Rebel bomber wing.
Agent Kallus leads a fighter wing to intercept the Rebellion's unique fighter aces. After skillfully catching Luke Skywalker and "Dutch" Vander in two firing arcs, Kallus adds a total of five dice to his flotilla's attacks for the round—one to his attack against Wedge Antilles, and one each to all the flotilla's attacks against Luke and "Dutch."
How Will You Fly Your Flotillas?
Ultimately, the best way to fly a flotilla of Gozanti-class cruisers is the way that best complements your overall strategy. But the question remains: how will you make use of these flexible flotillas to complement your fleet? Will you rely upon them to activate your squadrons? Will you field multiple flotillas and activate them early in order to draw out your opponent's larger ships? Will you use them to ensure your commands are more effective than your opponent's, from round to round?
These new Imperial flotillas present all manner of possibilities, and as you wait for our upcoming preview of the Rebel Transports Expansion Pack, we encourage you to share your favorite uses of the Gozanti flotillas with the other members of our community forums!
Herendon- Boarding Team Mos Eisley
Re: Star Wars Armada - Wave III News
Herendon Sa 07 Mai 2016, 06:27

"All troop carriers will assemble at the north entrance. The heavy transport ships will leave as soon as they’re loaded. Only two fighter escorts per ship."
–Leia Organa
There are just two expansions in the third wave of Star Wars™: Armada expansions, and only one for the Rebel Alliance. Still, that single expansion and its ships stand poised to make a major impact upon the course of the Galactic Civil War, and all without the benefit of attack dice. It turns out that attack dice are overrated…
Just like the Gozanti-class cruisers that we saw in last week's preview of the Imperial Assault Carriers Expansion Pack, the flotilla of Rebel transports from the Rebel Transports Expansion Pack enters the game as a tactically flexible ship that you can outfit with any of the different Fleet Support upgrades to perform different roles, depending upon the overall strategy that best fits your fleet. Unlike the Gozanti-class cruisers, however, the Rebel transports do not exist primarily as fleet support, they exist entirely as fleet support. In fact, when you field your flotilla of GR-75 transports as GR-75 Medium Transports, they fly across the battlefield with zero inherent ability to damage other ships.
At this point, newer players might be asking themselves, "Why would I want to play a ship that lacks any ability to damage other ships?" It is a perfectly valid question, but an even better question may be the one that the veteran players are likely asking themselves: "How many transports can I afford to run?"
Why Would I Want to Play a Transport?
There are two types of Rebel transport flotilla in the Rebel Transports Expansion Pack – the GR-75 Medium Transports and the GR-75 Combat Retrofits.


Of these, only the GR-75 Combat Retrofits feature any battery armament, and then only a single blue die from the front and rear hull zones. Still, as we discussed during last week's examination of the Imperial Assault Carriers Expansion Pack, a flotilla's true value is not a function of its firepower, but of its ability to enhance your fleet's tactical synergies or to provide additional tactical flexibility.
To this end, we look at what the transports provide in terms of upgrades and statistics, thinking about how they can best serve your overall strategy. Both the GR-75 Medium Transports and GR-75 Combat Retrofits feature the same array of upgrades: Officer, Fleet Support, and Offensive Retrofit. Of course, each can also equip a Title upgrade, as well.

Beyond these, we have the flotillas' attributes: Command of "1," Squadron value of "2," and Engineering of "2." These make your Rebel transports extremely nimble and tactically flexible. Also, because the cheaper of the two transport flotillas weighs in at just eighteen points, even as the Combat Retrofits still weigh in at a mere twenty-four points, they become a highly efficient tool for coordinating your fighter or bomber squadrons, especially when equipped with an Expanded Hangar Bay.
Meanwhile, the transports have only three hull and only one point of shields in each of their hull zones, so they are not bound to be commonly employed as combat vessels—even the GR-75 Combat Retrofits—and their Engineering value of "2" is not likely to get you thinking about long-term sustainability, despite the flotillas' fantastic ability to avoid a couple shots each round with their scatter and evade tokens.
Instead, just as with the Imperial Assault Carriers, you will find the Rebel transports defined by their Fleet Support upgrades. Equip your GR-75 Medium Transports with a Bomber Command Center , Expanded Hangar Bay, and Adar Tallon , and you have a forty-one point command vessel for your squadron strikeforce of Luke Skywalker and two Scurrg H-6 Bombers.

Alternatively, you can equip your GR-75 Medium Transports with Leia Organa and the Repair Crews upgrade, and you have a twenty-five point flotilla that can routinely rescue your other ships from the brink of destruction, discarding a damage card and ensuring that they will have an Engineering command at the tops of their stacks when they need them most.

Altogether, the Rebel Transports Expansion Pack features four Fleet Support upgrades—Bomber Command Center, Repair Crews, Jamming Field , and Comms Net. Of these, it shares the Bomber Command Center, Jamming Field, and Comms Net with the Imperial Assault Carriers, and exchanges the other expansion pack's Slicer Tools for the Repair Crews upgrade. Still, one could imagine a flotilla of GR-75 Combat Retrofits heading to battle with Slicer Tools in a fleet commanded by General Rieekan.
In fact, given that General Rieekan compensates so well for the transports' extreme vulnerability, one might even go so far as to say it is possible to imagine him commanding a good number of Combat Retrofits to battle in future fleets, each of them preceded by two or more squadrons. And this brings us to the next question…
How Many Transports?
As one would expect, the number of Rebel transports you will want to run in your fleet corresponds directly to what you hope they will accomplish, but their low, low, low fleet-point cost makes it easy for multiple transport flotillas to accomplish multiple tasks in a single fleet.
Given that you need a commander, and the cheapest commander is currently General Dodonna at twenty fleet points, your fleet could contain a maximum of twenty-one GR-75 Medium Transports or fifteen GR-75 Combat Retrofits. Of course, those fleet builds would hardly prove effective, due to their shortcomings in the attack dice category. However, as you begin to explore what you can do with one-hundred fleet points worth of squadrons, you might consider that if you chose to fly three transports, one of which had an Expanded Hangar Bay, they could command up to seven squadrons, enough to bombard your enemy's ships with six B-wing Squadrons and to send Tycho Celchu to head off any fighter wings.

The Rebel player begins the round by activating his flotillas of Rebel transports, forcing the Imperial player to move her Imperial-class Star Destroyer into range of the Defiance. This allows the Rebel player to fire with the Defiance at the end of this round and, if he has initiative, to fire again at the beginning of the next round.
With so many points invested in your squadrons and bomber strategy, you could further enhance their accuracy by running Toryn Farr . You might also consider protecting them with the Gallant Haven , which you could protect, in turn, by equipping it with Redundant Shields and by running Repair Crews on one or two of your transports.
But what if the enemy decides not to focus on your Gallant Haven but on the transports, themselves? Well, you could maintain a speed of "3" and rely upon the expertise of the new commander, General Cracken , whose ability would allow your transports to treat all the incoming attacks as obstructed. You could also equip one of them with the unique Bright Hope Title, which simply subtracts one point of damage from any attack not fired at your flotilla's rear hull zone. Alternatively, you could equip one with a Comms Net to ensure that not only would your Gallant Haven have your transport's Repair Crews working round the clock; it could assign its own engineers to damage control in a flash. Or it could even command your squadrons in a pinch.
It is this sort of flexibility that ensures your flotillas of Rebel transports will always be useful, and the second Title in the expansion reinforces this flexibility. For just one fleet point, the Quantum Storm provides your transport the ability to burst forward, such as when you want Adar Tallon to get back into range of Luke Skywalker or Han Solo.

The Quantum Storm executes a speed "1" maneuver, getting Adar Tallon within range to ready Han Solo after commanding him to attack with a squadron token and the flotilla's next activation. Because Han bears the Rogue keyword, this means he will be able to move and attack twice in the upcoming round.
So how many Rebel transports do you want in your fleet? You will almost certainly benefit from one to three. Beyond that, it will take a good deal of imagination to make use of a greater number of transports, although there may yet be someone looking to run a swarm of GR-75 Combat Retrofits in a fleet utilizing either General Rieekan or General Dodonna. After all, with the odds stacked so heavily against them, the brave and noble crew and captains of the Rebel Alliance and its transports may be willing to sacrifice themselves in order to bring down an Imperial-class Star Destroyer and win a meaningful victory in the Galactic Civil War.
Imagine the Possibilities
With its new flotillas and their Fleet Support upgrades, Armada Wave III is destined to make a major impact on your ongoing fleet battles—all without added piles of attack dice. How will you make use of the Imperial Assault Carriers Expansion Pack and the Rebel Transports Expansion Pack? The possibilities are myriad, and we invite you to share those that you imagine with the other members of our community forums.
Stay tuned for more news about these exciting expansions. In the meantime, head to your local retailer to pre-order your copies today!
Herendon- Boarding Team Mos Eisley
» Star Wars Armada - Wave IV News
» Star Wars Armada - Wave VII News
» Star Wars Armada - Wave V News
» Star Wars Armada - Wave I News
» Star Wars Armada - Wave VI News
» Star Wars Armada - Wave VII News
» Star Wars Armada - Wave V News
» Star Wars Armada - Wave I News
» Star Wars Armada - Wave VI News
MosEisleyRaumhafen :: Weitere Star Wars Spiele... :: [Armada] "Flottenbasierte Raumgefechte" :: Armada News
Seite 1 von 1
Befugnisse in diesem Forum
Sie können in diesem Forum nicht antworten|
|
|